Authentication And Authorization In ASP.NET Core Web API With JSON Web Tokens
Introduction
Authentication is the process of validating user credentials and authorization is the process of checking privileges for a user to access specific modules in an application. In this article, we will see how to protect an ASP.NET Core Web API application by implementing JWT authentication. We will also see how to use authorization in ASP.NET Core to provide access to various functionality of the application. We will store user credentials in an SQL server database and we will use Entity framework and Identity framework for database operations.
JSON Web Token (JWT) is an open standard (RFC 7519) that defines a compact and self-contained way for securely transmitting information between parties as a JSON object. This information can be verified and trusted because it is digitally signed. JWTs can be signed using a secret (with the HMAC algorithm) or a public/private key pair using RSA or ECDSA.
In its compact form, JSON Web Tokens consist of three parts separated by dots (.), which are:
- Header
- Payload
- Signature
Therefore, a JWT typically looks like the following.
xxxx.yyyy.zzzz
Please refer to below link for more details about JSON Web Tokens.
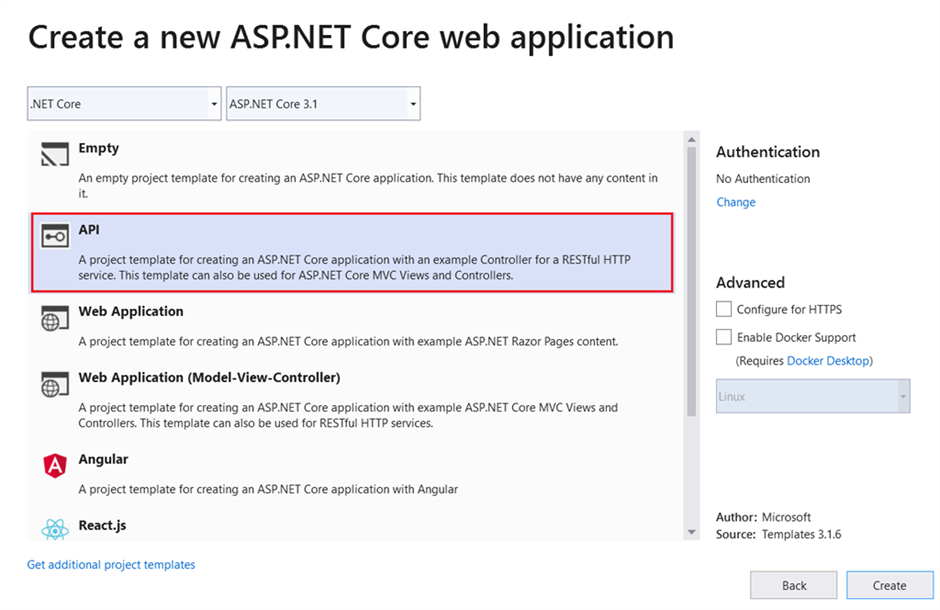
Create ASP.NET Core Web API using Visual Studio 2019
We can create an API application with ASP.NET Core Web API template.
We must install below libraries using NuGet package manager.
- Microsoft.EntityFrameworkCore.SqlServer
- Microsoft.EntityFrameworkCore.Tools
- Microsoft.AspNetCore.Identity.EntityFrameworkCore
- Microsoft.AspNetCore.Identity
- Microsoft.AspNetCore.Authentication.JwtBearer
We can modify the appsettings.json with below values.
appsettings.json
- {
- “Logging”: {
- “LogLevel”: {
- “Default”: “Information”,
- “Microsoft”: “Warning”,
- “Microsoft.Hosting.Lifetime”: “Information”
- }
- },
- “AllowedHosts”: “*”,
- “ConnectionStrings”: {
- “ConnStr”: “Data Source=(localdb)\\MSSQLLocalDB;Initial Catalog=SarathlalDB;Integrated Security=True;ApplicationIntent=ReadWrite;MultiSubnetFailover=False”
- },
- “JWT”: {
- “ValidAudience”: “http://localhost:4200”,
- “ValidIssuer”: “http://localhost:61955”,
- “Secret”: “ByYM000OLlMQG6VVVp1OH7Xzyr7gHuw1qvUC5dcGt3SNM”
- }
- }
We have added a database connection string and also added valid audience, valid issuer and secret key for JWT authentication in above settings file.
Create an “ApplicationUser” class inside a new folder “Authentication” which will inherit the IdentityUser class. IdentityUser class is a part of Microsoft Identity framework. We will create all the authentication related files inside the “Authentication” folder.
ApplicationUser.cs
- using Microsoft.AspNetCore.Identity;
- namespace JWTAuthentication.Authentication
- {
- public class ApplicationUser: IdentityUser
- {
- }
- }
We can create the “ApplicationDbContext” class and add below code.
ApplicationDbContext.cs
- using Microsoft.AspNetCore.Identity.EntityFrameworkCore;
- using Microsoft.EntityFrameworkCore;
- namespace JWTAuthentication.Authentication
- {
- public class ApplicationDbContext : IdentityDbContext<ApplicationUser>
- {
- public ApplicationDbContext(DbContextOptions<ApplicationDbContext> options) : base(options)
- {
- }
- protected override void OnModelCreating(ModelBuilder builder)
- {
- base.OnModelCreating(builder);
- }
- }
- }
Create a static class “UserRoles” and add below values.
UserRoles.cs
- namespace JWTAuthentication.Authentication
- {
- public static class UserRoles
- {
- public const string Admin = “Admin”;
- public const string User = “User”;
- }
- }
We have added two constant values “Admin” and “User” as roles. You can add many roles as you wish.
Create class “RegisterModel” for new user registration.
RegisterModel.cs
- using System.ComponentModel.DataAnnotations;
- namespace JWTAuthentication.Authentication
- {
- public class RegisterModel
- {
- [Required(ErrorMessage = “User Name is required”)]
- public string Username { get; set; }
- [EmailAddress]
- [Required(ErrorMessage = “Email is required”)]
- public string Email { get; set; }
- [Required(ErrorMessage = “Password is required”)]
- public string Password { get; set; }
- }
- }
Create class “LoginModel” for user login.
LoginModel.cs
- using System.ComponentModel.DataAnnotations;
- namespace JWTAuthentication.Authentication
- {
- public class LoginModel
- {
- [Required(ErrorMessage = “User Name is required”)]
- public string Username { get; set; }
- [Required(ErrorMessage = “Password is required”)]
- public string Password { get; set; }
- }
- }
We can create a class “Response” for returning the response value after user registration and user login. It will also return error messages, if the request fails.
Response.cs
- namespace JWTAuthentication.Authentication
- {
- public class Response
- {
- public string Status { get; set; }
- public string Message { get; set; }
- }
- }
We can create an API controller “AuthenticateController” inside the “Controllers” folder and add below code.
AuthenticateController.cs
- using JWTAuthentication.Authentication;
- using Microsoft.AspNetCore.Http;
- using Microsoft.AspNetCore.Identity;
- using Microsoft.AspNetCore.Mvc;
- using Microsoft.Extensions.Configuration;
- using Microsoft.IdentityModel.Tokens;
- using System;
- using System.Collections.Generic;
- using System.IdentityModel.Tokens.Jwt;
- using System.Security.Claims;
- using System.Text;
- using System.Threading.Tasks;
- namespace JWTAuthentication.Controllers
- {
- [Route(“api/[controller]”)]
- [ApiController]
- public class AuthenticateController : ControllerBase
- {
- private readonly UserManager<ApplicationUser> userManager;
- private readonly RoleManager<IdentityRole> roleManager;
- private readonly IConfiguration _configuration;
- public AuthenticateController(UserManager<ApplicationUser> userManager, RoleManager<IdentityRole> roleManager, IConfiguration configuration)
- {
- this.userManager = userManager;
- this.roleManager = roleManager;
- _configuration = configuration;
- }
- [HttpPost]
- [Route(“login”)]
- public async Task<IActionResult> Login([FromBody] LoginModel model)
- {
- var user = await userManager.FindByNameAsync(model.Username);
- if (user != null && await userManager.CheckPasswordAsync(user, model.Password))
- {
- var userRoles = await userManager.GetRolesAsync(user);
- var authClaims = new List<Claim>
- {
- new Claim(ClaimTypes.Name, user.UserName),
- new Claim(JwtRegisteredClaimNames.Jti, Guid.NewGuid().ToString()),
- };
- foreach (var userRole in userRoles)
- {
- authClaims.Add(new Claim(ClaimTypes.Role, userRole));
- }
- var authSigningKey = new SymmetricSecurityKey(Encoding.UTF8.GetBytes(_configuration[“JWT:Secret”]));
- var token = new JwtSecurityToken(
- issuer: _configuration[“JWT:ValidIssuer”],
- audience: _configuration[“JWT:ValidAudience”],
- expires: DateTime.Now.AddHours(3),
- claims: authClaims,
- signingCredentials: new SigningCredentials(authSigningKey, SecurityAlgorithms.HmacSha256)
- );
- return Ok(new
- {
- token = new JwtSecurityTokenHandler().WriteToken(token),
- expiration = token.ValidTo
- });
- }
- return Unauthorized();
- }
- [HttpPost]
- [Route(“register”)]
- public async Task<IActionResult> Register([FromBody] RegisterModel model)
- {
- var userExists = await userManager.FindByNameAsync(model.Username);
- if (userExists != null)
- return StatusCode(StatusCodes.Status500InternalServerError, new Response { Status = “Error”, Message = “User already exists!” });
- ApplicationUser user = new ApplicationUser()
- {
- Email = model.Email,
- SecurityStamp = Guid.NewGuid().ToString(),
- UserName = model.Username
- };
- var result = await userManager.CreateAsync(user, model.Password);
- if (!result.Succeeded)
- return StatusCode(StatusCodes.Status500InternalServerError, new Response { Status = “Error”, Message = “User creation failed! Please check user details and try again.” });
- return Ok(new Response { Status = “Success”, Message = “User created successfully!” });
- }
- [HttpPost]
- [Route(“register-admin”)]
- public async Task<IActionResult> RegisterAdmin([FromBody] RegisterModel model)
- {
- var userExists = await userManager.FindByNameAsync(model.Username);
- if (userExists != null)
- return StatusCode(StatusCodes.Status500InternalServerError, new Response { Status = “Error”, Message = “User already exists!” });
- ApplicationUser user = new ApplicationUser()
- {
- Email = model.Email,
- SecurityStamp = Guid.NewGuid().ToString(),
- UserName = model.Username
- };
- var result = await userManager.CreateAsync(user, model.Password);
- if (!result.Succeeded)
- return StatusCode(StatusCodes.Status500InternalServerError, new Response { Status = “Error”, Message = “User creation failed! Please check user details and try again.” });
- if (!await roleManager.RoleExistsAsync(UserRoles.Admin))
- await roleManager.CreateAsync(new IdentityRole(UserRoles.Admin));
- if (!await roleManager.RoleExistsAsync(UserRoles.User))
- await roleManager.CreateAsync(new IdentityRole(UserRoles.User));
- if (await roleManager.RoleExistsAsync(UserRoles.Admin))
- {
- await userManager.AddToRoleAsync(user, UserRoles.Admin);
- }
- return Ok(new Response { Status = “Success”, Message = “User created successfully!” });
- }
- }
- }
We have added three methods “login”, “register”, and “register-admin” inside the controller class. Register and register-admin are almost same but the register-admin method will be used to create a user with admin role. In login method, we have returned a JWT token after successful login.
We can make below changes in “ConfigureServices” and “Configure” methods in “Startup” class as well.
Startup.cs
- using JWTAuthentication.Authentication;
- using Microsoft.AspNetCore.Authentication.JwtBearer;
- using Microsoft.AspNetCore.Builder;
- using Microsoft.AspNetCore.Hosting;
- using Microsoft.AspNetCore.Identity;
- using Microsoft.EntityFrameworkCore;
- using Microsoft.Extensions.Configuration;
- using Microsoft.Extensions.DependencyInjection;
- using Microsoft.Extensions.Hosting;
- using Microsoft.IdentityModel.Tokens;
- using System.Text;
- namespace JWTAuthentication
- {
- public class Startup
- {
- public Startup(IConfiguration configuration)
- {
- Configuration = configuration;
- }
- public IConfiguration Configuration { get; }
- // This method gets called by the runtime. Use this method to add services to the container.
- public void ConfigureServices(IServiceCollection services)
- {
- services.AddControllers();
- // For Entity Framework
- services.AddDbContext<ApplicationDbContext>(options => options.UseSqlServer(Configuration.GetConnectionString(“ConnStr”)));
- // For Identity
- services.AddIdentity<ApplicationUser, IdentityRole>()
- .AddEntityFrameworkStores<ApplicationDbContext>()
- .AddDefaultTokenProviders();
- // Adding Authentication
- services.AddAuthentication(options =>
- {
- options.DefaultAuthenticateScheme = JwtBearerDefaults.AuthenticationScheme;
- options.DefaultChallengeScheme = JwtBearerDefaults.AuthenticationScheme;
- options.DefaultScheme = JwtBearerDefaults.AuthenticationScheme;
- })
- // Adding Jwt Bearer
- .AddJwtBearer(options =>
- {
- options.SaveToken = true;
- options.RequireHttpsMetadata = false;
- options.TokenValidationParameters = new TokenValidationParameters()
- {
- ValidateIssuer = true,
- ValidateAudience = true,
- ValidAudience = Configuration[“JWT:ValidAudience”],
- ValidIssuer = Configuration[“JWT:ValidIssuer”],
- IssuerSigningKey = new SymmetricSecurityKey(Encoding.UTF8.GetBytes(Configuration[“JWT:Secret”]))
- };
- });
- }
- // This method gets called by the runtime. Use this method to configure the HTTP request pipeline.
- public void Configure(IApplicationBuilder app, IWebHostEnvironment env)
- {
- if (env.IsDevelopment())
- {
- app.UseDeveloperExceptionPage();
- }
- app.UseRouting();
- app.UseAuthentication();
- app.UseAuthorization();
- app.UseEndpoints(endpoints =>
- {
- endpoints.MapControllers();
- });
- }
- }
- }
We can add “Authorize” attribute inside the “WeatherForecast” controller.

We must create a database and required tables before running the application. As we are using entity framework, we can use below database migration command with package manger console to create a migration script.
“add-migration Initial”
Use below command to create database and tables.
“update-database”
If you check the database using SQL server object explorer, you can see that below tables are created inside the database.
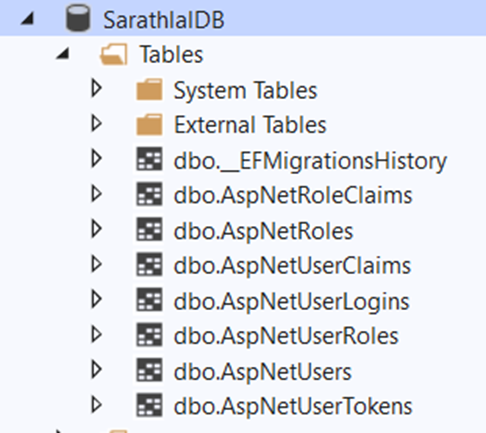
Above seven tables are used by identity framework to manage authentication and authorization.
We can run the application and try to access get method in weatherforecast controller from Postman tool.
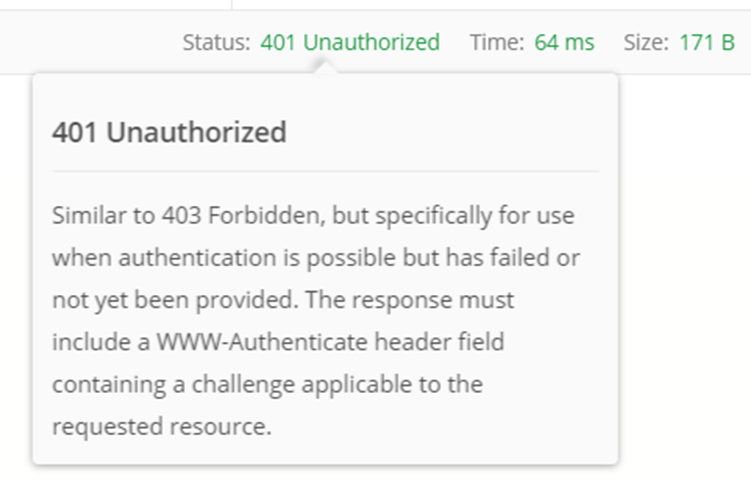
We have received a 401 unauthorized error. Because, we have added Authorize attribute to entire controller. We must provide a valid token via request header to access this controller and methods inside the controller.
We can create a new user using register method in authenticate controller.
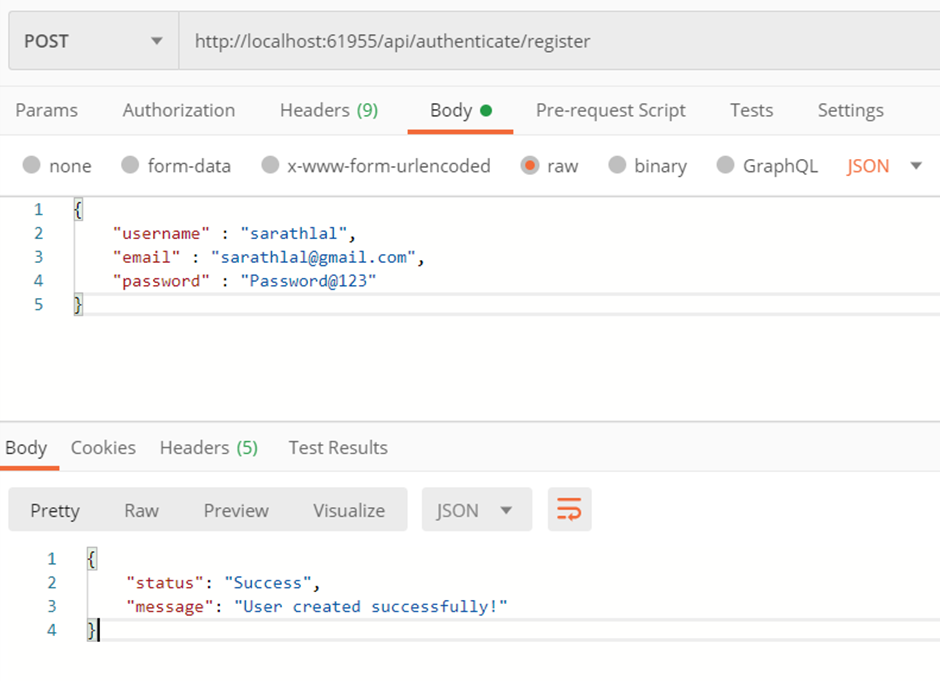
We can use above user credentials to login and get a valid JWT token.
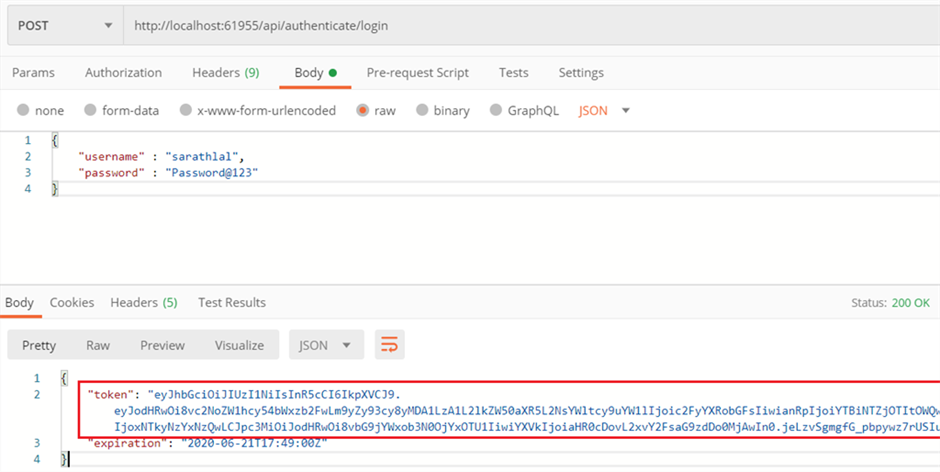
We have received a token after successful login with above credentials.
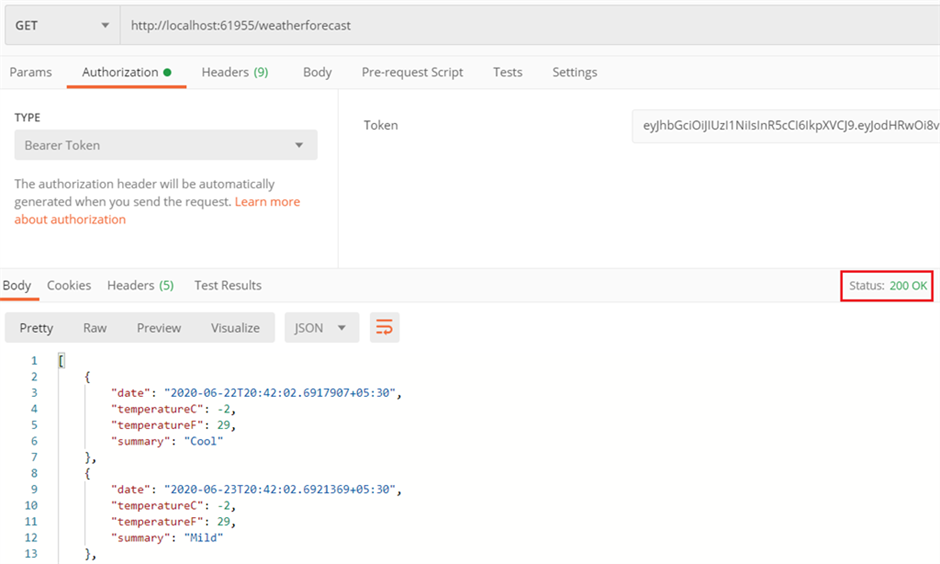
We can pass above token value as a bearer token inside the authorization tab and call get method of weatherforecast controller again.
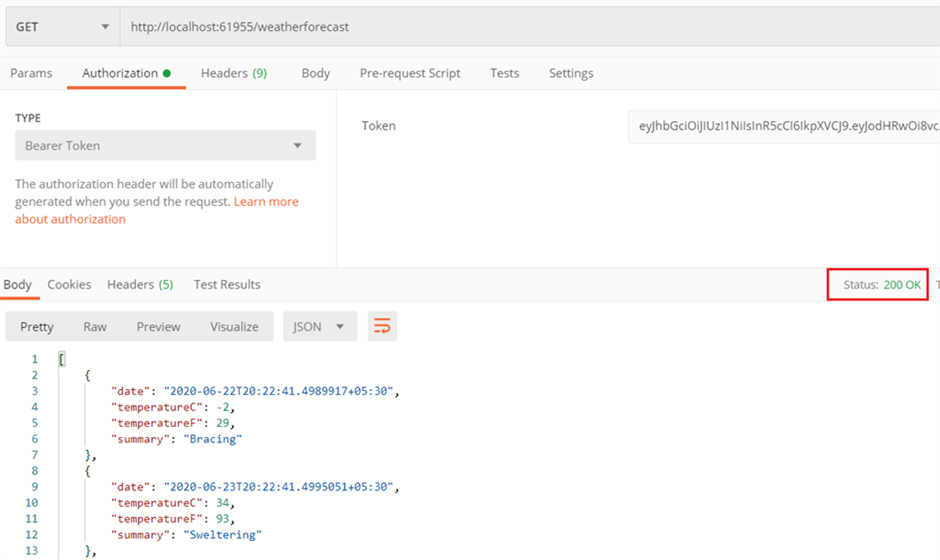
This time, we have successfully received the values from controller.
We can modify the weatherforecast controller with role-based authorization.
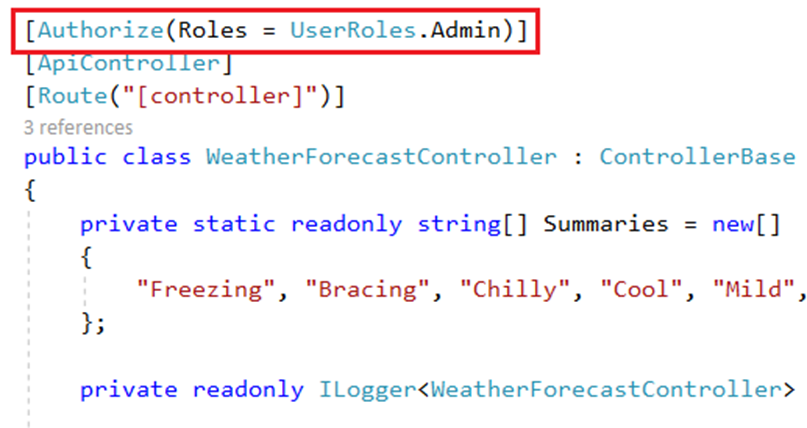
Now, only users with admin role can access this controller and methods.
We can try to access the weatherforecast controller with same token again in Postman tool.

We have received a 403 forbidden error now. Even though, we are passing a valid token we don’t have sufficient privilege to access the controller. To access this controller, user must have an admin role permission. Current user is a normal user and do not have any admin role permission.
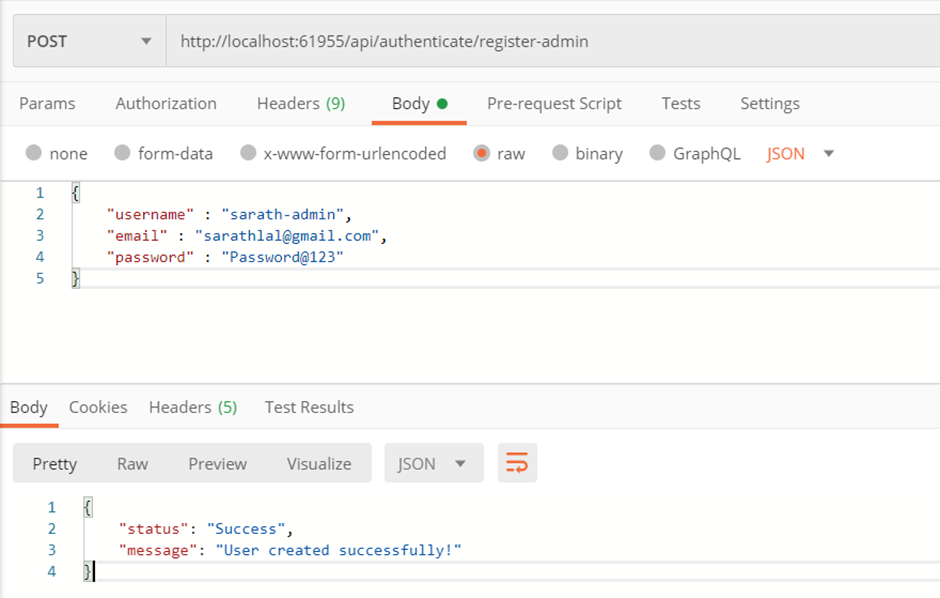
We can create a new user with admin role. We already have a method “register-admin” in authenticate controller for the same purpose.
We can login with this new user credentials and get a new token and use this token instead of old token to access the weatherforecast controller.
We have again received the values from weatherforecast controller successfully.
We can see the token payload and other details using jwt.io site.
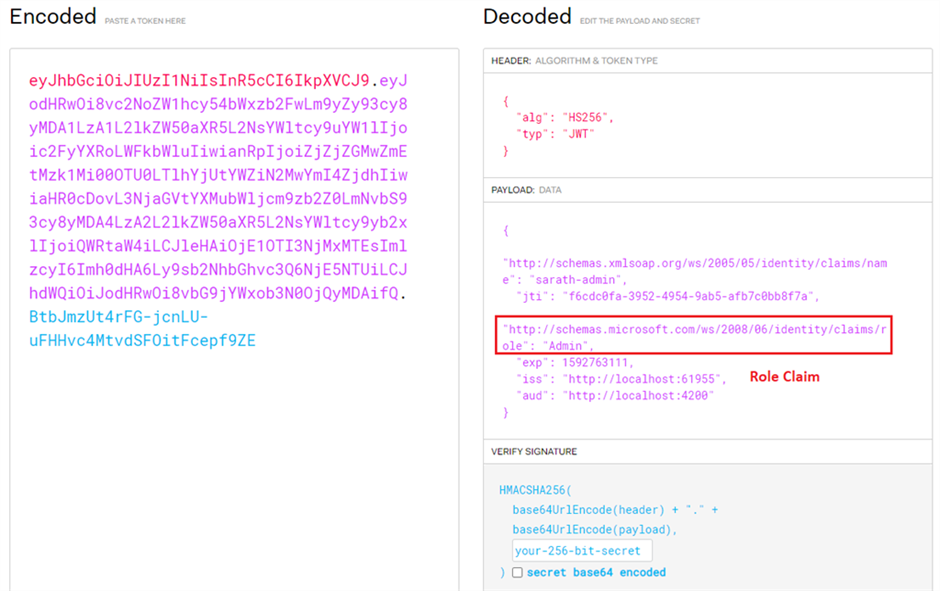
Inside the payload section, you can see the user name, role and other details as claims.
Conclusion
In this post, we have seen how to create a JSON web token in ASP.NET Core Web API application and use this token for authentication and authorization. We have created two users, one without any role and one with admin role. We have applied the authentication and authorization in controller level and saw the different behaviors with these two users.
Overview of ASP.NET Core authentication
- Article
- 06/04/2022
- 11 minutes to read
- 14 contributors
By Mike Rousos
Authentication is the process of determining a user’s identity. Authorization is the process of determining whether a user has access to a resource. In ASP.NET Core, authentication is handled by the authentication service, IAuthenticationService, which is used by authentication middleware. The authentication service uses registered authentication handlers to complete authentication-related actions. Examples of authentication-related actions include:
- Authenticating a user.
- Responding when an unauthenticated user tries to access a restricted resource.
The registered authentication handlers and their configuration options are called “schemes”.
Authentication schemes are specified by registering authentication services in Program.cs:
- By calling a scheme-specific extension method after a call to AddAuthentication, such as AddJwtBearer or AddCookie. These extension methods use AuthenticationBuilder.AddScheme to register schemes with appropriate settings.
- Less commonly, by calling
AuthenticationBuilder.AddSchemedirectly.
For example, the following code registers authentication services and handlers for cookie and JWT bearer authentication schemes:
C#Copy
builder.Services.AddAuthentication(JwtBearerDefaults.AuthenticationScheme) .AddJwtBearer(JwtBearerDefaults.AuthenticationScheme,options => builder.Configuration.Bind("JwtSettings", options))
.AddCookie(CookieAuthenticationDefaults.AuthenticationScheme,options => builder.Configuration.Bind("CookieSettings", options));
The AddAuthentication parameter JwtBearerDefaults.AuthenticationScheme is the name of the scheme to use by default when a specific scheme isn’t requested.
If multiple schemes are used, authorization policies (or authorization attributes) can specify the authentication scheme (or schemes) they depend on to authenticate the user. In the example above, the cookie authentication scheme could be used by specifying its name (CookieAuthenticationDefaults.AuthenticationScheme by default, though a different name could be provided when calling AddCookie).
In some cases, the call to AddAuthentication is automatically made by other extension methods. For example, when using ASP.NET Core Identity, AddAuthentication is called internally.
The Authentication middleware is added in Program.cs by calling UseAuthentication. Calling UseAuthentication registers the middleware that uses the previously registered authentication schemes. Call UseAuthentication before any middleware that depends on users being authenticated.
Authentication concepts
Authentication is responsible for providing the ClaimsPrincipal for authorization to make permission decisions against. There are multiple authentication scheme approaches to select which authentication handler is responsible for generating the correct set of claims:
- Authentication scheme
- The default authentication scheme, discussed in the next section.
- Directly set HttpContext.User.
There’s no automatic probing of schemes. If the default scheme isn’t specified, the scheme must be specified in the authorize attribute, otherwise, the following error is thrown:
InvalidOperationException: No authenticationScheme was specified, and there was no DefaultAuthenticateScheme found. The default schemes can be set using either AddAuthentication(string defaultScheme) or AddAuthentication(Action<AuthenticationOptions> configureOptions).
Authentication scheme
The authentication scheme can select which authentication handler is responsible for generating the correct set of claims. For more information, see Authorize with a specific scheme.
An authentication scheme is a name that corresponds to:
- An authentication handler.
- Options for configuring that specific instance of the handler.
Schemes are useful as a mechanism for referring to the authentication, challenge, and forbid behaviors of the associated handler. For example, an authorization policy can use scheme names to specify which authentication scheme (or schemes) should be used to authenticate the user. When configuring authentication, it’s common to specify the default authentication scheme. The default scheme is used unless a resource requests a specific scheme. It’s also possible to:
- Specify different default schemes to use for authenticate, challenge, and forbid actions.
- Combine multiple schemes into one using policy schemes.
Authentication handler
An authentication handler:
- Is a type that implements the behavior of a scheme.
- Is derived from IAuthenticationHandler or AuthenticationHandler<TOptions>.
- Has the primary responsibility to authenticate users.
Based on the authentication scheme’s configuration and the incoming request context, authentication handlers:
- Construct AuthenticationTicket objects representing the user’s identity if authentication is successful.
- Return ‘no result’ or ‘failure’ if authentication is unsuccessful.
- Have methods for challenge and forbid actions for when users attempt to access resources:
- They’re unauthorized to access (forbid).
- When they’re unauthenticated (challenge).
RemoteAuthenticationHandler<TOptions> vs AuthenticationHandler<TOptions>
RemoteAuthenticationHandler<TOptions> is the class for authentication that requires a remote authentication step. When the remote authentication step is finished, the handler calls back to the CallbackPath set by the handler. The handler finishes the authentication step using the information passed to the HandleRemoteAuthenticateAsync callback path. OAuth 2.0 and OIDC both use this pattern. JWT and cookies don’t since they can directly use the bearer header and cookie to authenticate. The remotely hosted provider in this case:
- Is the authentication provider.
- Examples include Facebook, Twitter, Google, Microsoft, and any other OIDC provider that handles authenticating users using the handlers mechanism.
Authenticate
An authentication scheme’s authenticate action is responsible for constructing the user’s identity based on request context. It returns an AuthenticateResult indicating whether authentication was successful and, if so, the user’s identity in an authentication ticket. See AuthenticateAsync. Authenticate examples include:
- A cookie authentication scheme constructing the user’s identity from cookies.
- A JWT bearer scheme deserializing and validating a JWT bearer token to construct the user’s identity.
Challenge
An authentication challenge is invoked by Authorization when an unauthenticated user requests an endpoint that requires authentication. An authentication challenge is issued, for example, when an anonymous user requests a restricted resource or follows a login link. Authorization invokes a challenge using the specified authentication scheme(s), or the default if none is specified. See ChallengeAsync. Authentication challenge examples include:
- A cookie authentication scheme redirecting the user to a login page.
- A JWT bearer scheme returning a 401 result with a
www-authenticate: bearerheader.
A challenge action should let the user know what authentication mechanism to use to access the requested resource.
Forbid
An authentication scheme’s forbid action is called by Authorization when an authenticated user attempts to access a resource they’re not permitted to access. See ForbidAsync. Authentication forbid examples include:
- A cookie authentication scheme redirecting the user to a page indicating access was forbidden.
- A JWT bearer scheme returning a 403 result.
- A custom authentication scheme redirecting to a page where the user can request access to the resource.
A forbid action can let the user know:
- They’re authenticated.
- They’re not permitted to access the requested resource.
See the following links for differences between challenge and forbid:
- Challenge and forbid with an operational resource handler.
- Differences between challenge and forbid.
Authentication providers per tenant
ASP.NET Core doesn’t have a built-in solution for multi-tenant authentication. While it’s possible for customers to write one using the built-in features, we recommend customers to consider Orchard Core or ABP Framework for multi-tenant authentication.
Orchard Core is:
- An open-source, modular, and multi-tenant app framework built with ASP.NET Core.
- A content management system (CMS) built on top of that app framework.
See the Orchard Core source for an example of authentication providers per tenant.
Very interesting details you have remarked, regards for posting.Blog monetyze
Hey very cool blog!! Man .. Beautiful .. Amazing .. I’ll bookmark your web site and take the feeds also…I’m happy to find numerous useful info here in the post, we need develop more techniques in this regard, thanks for sharing. . . . . .