Now in this article, we will see the implementation of SignalR with .NET core
Software’s requires to develop an application with SignalR on ASP.NET Core
- Node package manager(npm) – https://www.npmjs.com/get-npm
- .NET Core SDK 2.1 or later -https://www.microsoft.com/net/download/archives
- Visual Studio 2017 (Version 15.7.3 or later)
Let’s create simple communication application using SignalR with ASP.NET Core
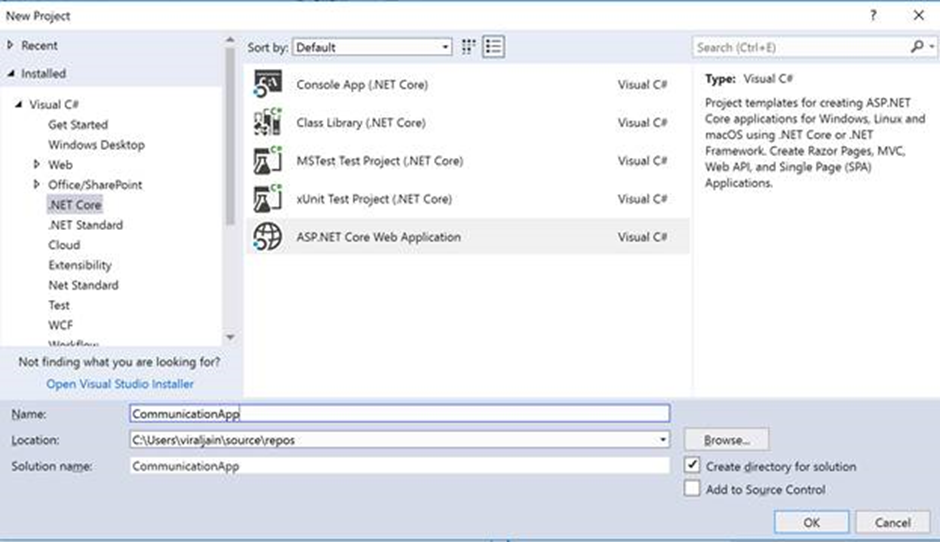
- File – New – Project – Create New web application.
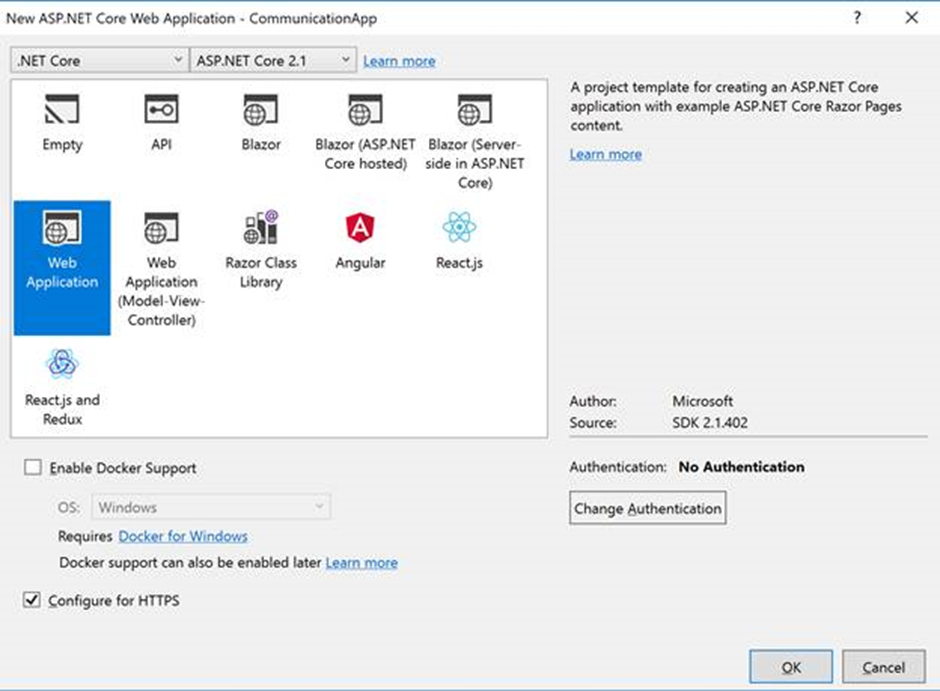
- Then select Web Application.
- Next step is to download a SignalR module using a node package manager.
- npm init -y
- npm install @aspnet/signalr
- Copy signalr.js file from node installed location and copy in our project.
- Do not forget to include signalr.js file into your HTML Page script tag.
Create SignaR Hub
- Now to create a SignalR hub, a signalR hub is a class that inherits from Microsoft.ASpNetCore.SignalR.Hub.
- Let’s create a method that can be accessed from JavaScript.
- To send the message to all clients, I have created “SendMessage” method and within this method, I will call the “ReceiveMessage” method of the connected client.
- using Microsoft.AspNetCore.SignalR;
- using System.Threading.Tasks;
- namespace CommunicationApp
- {
- public class ChatHub : Hub
- {
- public async Task SendMessage(string user, string message)
- {
- await Clients.All.SendAsync(“ReceiveMessage”, user, message);
- }
- }
- }
- Next step is that we need to configure our project to handle the SignalR Request.
- So to configure SignalR in our project, we need to add signalR service to ConfigureService method of startup class.
- publicvoid ConfigureServices(IServiceCollection services)
- {
- ….
- ….
- services.AddSignalR();
- }
- Also we need to configure the route to signalR hubs using UseSignalR method defined in configure method of startup class.
- This method(app.UseSignalR) adds SignalR to a middleware pipeline.
- publicvoid Configure(IApplicationBuilder app)
- {
- …
- …
- app.UseSignalR(routes =>
- {
- routes.MapHub<ChatHub>(“/chatHub”);
- });
- app.UseMvc();
- }
- So by using JavaScript code, we call the server method called “SendMessage” and also we have registered ReceiveMessage method, which is usually called from the server to send the message to the client.
- Just create chat.js file under “wwwroot/js” folder.
- const connection = new signalR.HubConnectionBuilder()
- .withUrl(“/chatHub”)
- .build();
- //This method receive the message and Append to our list
- connection.on(“ReceiveMessage”, (user, message) => {
- const msg = message.replace(/&/g, “&”).replace(/</g, “<“).replace(/>/g, “>”);
- const encodedMsg = user + ” :: ” + msg;
- const li = document.createElement(“li”);
- li.textContent = encodedMsg;
- document.getElementById(“messagesList”).appendChild(li);
- });
- connection.start().catch(err => console.error(err.toString()));
- //Send the message
- document.getElementById(“sendMessage”).addEventListener(“click”, event => {
- const user = document.getElementById(“userName”).value;
- const message = document.getElementById(“userMessage”).value;
- connection.invoke(“SendMessage”, user, message).catch(err => console.error(err.toString()));
- event.preventDefault();
- });
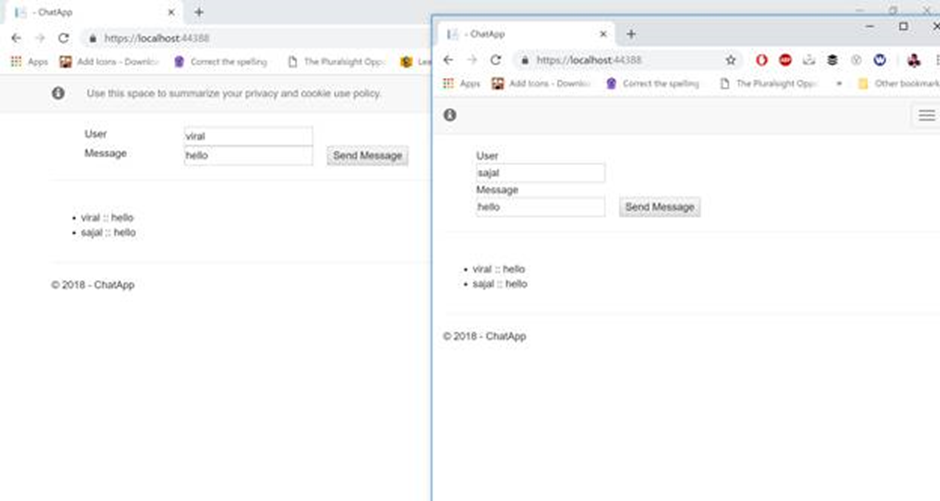
- Now replace the following code content in page\index.cshtml file.
- @page
- <div class=”container”>
- <div class=”row”> </div>
- <div class=”row”>
- <div class=”col-md-12″>
- <div class=”col-md-6″>
- <div class=”col-md-3″>User</div>
- <div class=”col-md-9″><input type=”text” id=”userName” /></div>
- </div>
- </div>
- <div class=”col-md-12″>
- <div class=”col-md-6″>
- <div class=”col-md-3″>Message</div>
- <div class=”col-md-9″>
- <input type=”text” id=”userMessage” />
- <input type=”button” id=”sendMessage” value=”Send Message” />
- </div>
- </div>
- </div>
- </div>
- <div class=”row”>
- <div class=”col-12″>
- <hr />
- </div>
- </div>
- <div class=”row”>
- <div class=”col-6″> </div>
- <div class=”col-6″>
- <ul id=”messagesList”></ul>
- </div>
- </div>
- </div>
- <script src=”~/lib/signalr/signalr.js”></script>
- <script src=”~/js/chat.js”></script>